Showing posts with label For the Birds. Show all posts

Sunday, April 10, 2016

White Yo-yo Owl

  This owl was a lot of fun to make. I used several different white fabrics and some lace to make the yoyos. The wings were also made out of lace and gave the owl a very textured look. Usually I make the owl to be given as a gift but this owl ended up being a gift for me and I love it!

Sunday, September 15, 2013

Flock of Yo-Yo Owls

Birthday Owl for Granddaughter  and Mother's Day Owl
Birthday Owl for Sister
While browsing through a Mary Maxim craft catalog I saw these very bright and cute yo-yo owl kits.  As you know I love making yo-yo's so I purchased the kit.  Once it arrived I quickly got busy making the yo-yo's for the body. Once those were finished I started on the wings and horns but I did not like the "raw" technique the pattern directions gave.  So instead of just folding the wings in half and sewing a running stitch I ironed under about 1/8" of the wing edge then I folded the wing in half and completed it with the running stitch.  For the horn's I used some fusible webbing to adhere a bottom piece of fabric which gave the horns more body so they stood up better. 


Thank you Owl for Eldest Sister

The yo-yo's for the owl's body is a great way to use up those smaller fabric scraps which is what I did for the two brown, white and beige owls. At the craft store I purchased the wood base, spool, dowel, chenille stems and  glue on wiggle eyes and used my pattern and instructions from the kit to make owls using up fabric in my stash. As soon as I get some more time to go through my fabric I'm going to be making a few more owls.
 
What a "hoot" everyone had opening up their gift and I had a "hoot" making them!


Monday, September 2, 2013

Trio of Yo-Yo Cardinals

Trio of Yo-Yo Cardinals 2012
Sometimes I see Yo-Yo kits (usually in the Mary Maxim catalog) that are just too cute not to buy and make. The kit had materials to make six cardinals.  Three I used as Christmas gifts and three I kept for myself.  As you can see each little yo-yo cardinal has a personality all its own.


Sunday, September 1, 2013

Fun Winter Yo-Yo Birds

Tweet Yo-Yo Winter Bird  January Card for Mom
First off let me tell you I got my inspiration for these cute yo-yo birds from Crafts n Things magazine. It was in their winter issue 2012 they had directions for making this bird out of almonds.  After reading their directions I realized I didn't have the patience to make their almond version but as I was looking at the picture my eye also landed on one of my oval yo-yo's and the "ah-ha" moment hit me!  I could make this bird using almond colored fabric and my oval yo-yo maker.


Yo-Yo Winter Bird Card II
The branch and "Thinking of You" saying was cut out using my Cricut machine.  The birds hat is made out of felt with a pom-pom at the tip. The feet are made of brown covered wire and I used black beads for the eyes and a small piece of felt for the beak. This fabric version of the bird was so easy to make that I made a second card for one of my sisters.


Sunday, August 18, 2013

Time for Autumn Leaves and Turkey

2012 Turkey Napkin Card
2012 Autumn Leaf Card
I love collecting leaves in the fall and collect quite a few while out walking the dog.  I sent the leaf card to my sister in California as she doesn't get to experience the fall colors the way that I do and I wanted to share a little bit of the season with her. 

Since learning how to make cards with napkins and plastic wrap when I saw this napkin with the turkey on it I just had to turn it into a card for my mom.  A little gold glitter makes this turkey really stand out!


Wednesday, August 3, 2011

Fine Feathered Friends
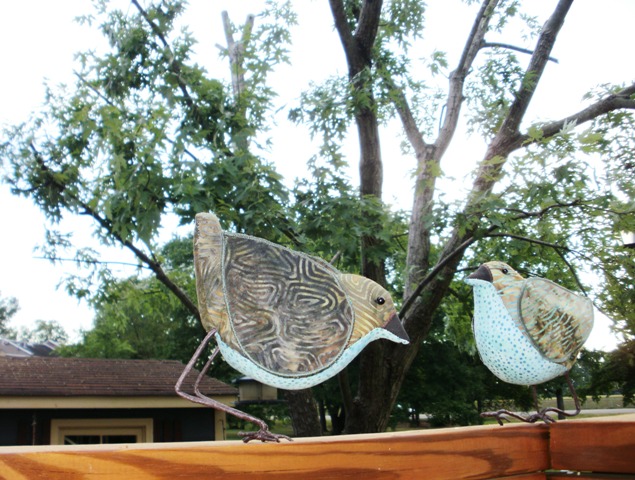
The summer is always a busy time for me as there are so many birthdays to make cards and gifts for that sometimes it is difficult to keep up with them all.  I have to admit that once in a while I am forced to buy a store-bought card or gift just to keep my sanity. Usually I manage to balance it all out the next year by alternating who gets the homemade card or gift versus the store-bought card and gift. 

Ready for flight
With all this going on I did manage to finish Spreckles friend.  Spreckles is on the right in the photo above and his friend is on the left. Each time I sew one of the birds I find it gets easier and the legs get stronger and I am able to make them hold up the bird better.  With Puff (see him under For the Birds) and Spreckles they tend to keep their balance on the bend or elbow of the leg but with the new friend his legs better support him and in the one photo he looks like he is getting ready to take off in flight!  The friend hasn't been named yet as he is being shipped to my mom who will get the chance to name him. Other gifts have been in the works and I am waiting to show them to you at a later date as I don't want to give away the surprise.   So stay tuned.

Sunday, May 15, 2011

Fabric Bird Named Spreckles

My Bird Spreckles
For me as I work with each project it seems to take on its own personality - that's how it was with Spreckles.  From the get- go Spreckles was just harder to work with than Puff. His legs gave me the most trouble and then what should have been easy (sewing on his eyes) became a major undertaking as they just didn't want to go on straight. Through each trial and error of getting Spreckles put together, we bonded. Although not quite as glamorous as Puff, he is still quite handsome.  Working with the bird pattern designed by Terry Grant I'm finding the hardest and most challenging part for me is bending the wire for the legs and inserting them into the bird properly.  In Terry's interview with Pokey from Quilting Arts magazine, Terry said the most important part for her was getting the beak to stay stuffed and firm.  I know I have lots more to learn when making birds so don't be surprised to see a whole flock show up one day!  After all that is part of this year's Challenge with my friend Connie.

Sunday, April 17, 2011

"Puff" the Bubbled Fabric Breasted Bird

"Puff"
I'm so excited that my experiment worked! It wasn't as hard as I thought it might be in fact it was pretty easy to work with the bubbled fabric.  First, I drew the pattern piece onto the back of the bubbled fabric. Next I straight stitched around the drawn line with my sewing machine and then I cut the piece out.  The bubbles on the outside of the stitched line went flat once I cut them which was great for sewing and the inside bubbles retained their shape.  It was a little tricky turning and stuffing the beak but with the help of a stuffing tool and a bamboo chopstick I was able to get the shape of the beak the way I wanted.  The pattern was very easy to follow.  I can't wait to make another bird but next time I want to use a heavier gauge of wire.  I wasn't able to locate the 19 gauge wire the pattern called for at any of the craft stores in my area so I used a 22 gauge which is just a little too thin to completely hold the birds weight without resting on the elbows of the legs. I found a size 12 gauge copper wire yesterday at a local craft store and I am going to experiment with it and then the next time I go to the hardware store I'll be checking their aisles for wire.

Sunday, April 10, 2011

Bubbles and Birds

Bubbling Fabric for the Birds
What do bubbles, birds and a dishwasher silverware sorter have in common?  They are all a part of a design I hope will come together.

Last night I played with the bubbling fabric technique in the book Fabric Embellishing the basics and beyond by Ruth Chandler, Liz Kettle, Heahter Thomas and Lauren Vlcek (I'm still waiting for my book to arrive but Connie graciously loaned me hers so I could play). I didn't have a metal grid anywhere in the house so while searching through my cabinets I found an extra dishwasher silverware sorter that had the right size grid I was looking for. My one concern was while ironing the fusible interfacing to the fabric there was a small chance I could melt the plastic but all turned out well and I was able to remove my bubbled fabric with no damage to the fabric or the plastic dishwasher tray.

 Now that I have overcome that hazzard the next part of my design idea is to see if I can cut and sew the breast pattern piece from the bubbled fabric. The bird pattern I am using is one created by Terry Grant for the 2009/2010  International Quilt Festival magazine. As I was mulling this over before falling to sleep last night I decided I would need to draw the breast pattern piece on the back of my fabric and then stitch around the drawn line before cutting out the piece. By sewing on the line I'm hoping to anchor down my bubbles so that when I cut it out the shape will remain.

As Mom's Easter card is waiting to be finished and a couple of birthday presents and cards need to be made, I'm not sure when I will get back to this part of my fabric bird so you'll just have to keep checking back! Oh, and don't forget to wish me luck on this process, I think I'm going to need it.

Sunday, April 3, 2011

Happy Birdie Day

Happy Birdie Day!
A while back I ordered the "Straight from the Nest" Cricut cartridge and I recently had a chance to play with it.  It is a fun cartridge and I can't wait to use it again.  This card was made for my sister-in-law and I really hope she likes it.  Did I mention this was a milestone birthday?  Here is the inside of the birthday card.

Sunday, January 9, 2011

All About Birds

Whimsical Birdhouse
It seems 2011 is definitely the year for birds. Not just chickens and owls but all birds and that is really exciting as birds are fun and whimsical and entertaining. I love watching the birds that visit my backyard, I get visited by cardinals, blue jays, crows and all sorts of smaller birds. This wonderful little ceramic and wood bird house is a Christmas gift from my son and family and I love it. It reminds me of my mom and her love of teacups, it speaks to both the creative and whimsical side of me and just plain makes me smile when I see it.

When I set the birdhouse on the shelf in my kitchen my first thought was it needed to be surrounded by birds and then I got surprised by another of my Christmas presents as there was this very comical punk looking cardinal in my gift bag. He is the greatest accompaniment to the bird house. The other cardinal I had sitting on a shelf in the living room so I moved him to be near the bird house but I still think I need more birds. And then just this week my friend Connie sends me a link to Abby Glassenberg's website. She does an amazing job making birds out of fabric and she even has a book out called The Artful Bird: Feathered Friends to Make and Sew. Then I remembered in my International Festival Quilt 2009/2010 magazine there is a pattern and directions by Terry Grant for making fabric birds which I have been wanting to try. I think they will look great sitting on the shelf with the bird house and I can't wait to get started.

Sunday, November 21, 2010

Things Thanksgiving Part II

Owl YoYo Card

Thanksgiving Postcard Card

Whew!  I barely finished my cards on time to get them in the mail on Friday.  Actually I fixed up a couple of goodies and put them inside one of the USPS flat rate boxes and then added the cards to the box. For me it is as much fun to send goody boxes as it is to receive them.  My mom always use to send me fun little items in the mail (she still does, just not as frequently as she used to). She always wraps whatever it is in wrapping paper or tissue paper and adds a pretty bow or sticker. I never knew what would be waiting for me inside the box but I was always excited to get one as I knew it would be fun. I'm hoping when she receives the box from me that she feels in a small way that I have come to visit her.

The card I made for my mom this month is of an owl using an old sweater vest that I have been waiting to repurpose, some felt and of course a couple of yoyo's. My inspiration for the card came when Don and I went out to breakfast at the Cracker Barrel restaurant and I saw this cute cutlery holder in the shape of an owl.  It's eyes were made using gathered ribbon and my husband remarked that it would look good with yoyo eyes - and that was it - I knew I had to try it. 

You may also remember from last week I was concerned that I didn't have enough time to finish the Thanksgiving postcards, well, inspiration struck and I used some double-stick fusible web to add the postcard fabric to a card.  I love the way it turned out and think I am going to make a few more this way too.

Things I am thankful for today: my husband and family, friends, the spectacular colors of the fall leaves, the little chipmunk that visits my backyard and the fun I get from being creative.  What are you thankful for today?

Sunday, November 14, 2010

Things Thanksgiving

Thanksgiving Fabric Postcards
It always seems that no matter how much I try to be prepared for the holidays they always catch me unawares.  A couple of years ago I found this great fabric panel with these wonderful pictures and sayings for Thanksgiving.  I was so excited as I thought wow these will be so easy to embellishment with either hand or machine stitching and then send out to my family.  And here we are today (a couple of years later) and I have only managed to complete two of them. I was so tempted the other day to donate or toss out the others that still need to be embellished and put together but something inside me said "someday, someday you'll have time to finish these", so I put them back in my box for another some day.

2006 Turkey Fruit Carving
As you may be aware I like to be organized with my pictures, crafts, cabinets, etc but I find that sometimes my organization will just "explode" in all directions - probably a result of over thinking it.  Anyways, this happened recently to my digital photos as I got a new computer this year and transferred them over from my old computer into new file folders labeled by year and then activity. What I didn't take into account, but remembered later, was Don had some pictures on his computer too and when I went to check to see what I was missing I came across the Turkey Fruit Carving he had made in 2006.  I was so excited to find it as I wanted to put the picture in the same file folder as his sailboat fruit carving. I still have photos I am looking for and I also would like to scan my hard copy photos to my computer plus save them to a disk or USB drive but that will have to wait for a while.  For now I am still trying to finish up my UFO's.