 |
| Mom's November Card - Jumbo YoYo Pumpkin |
Welcome! We hope you enjoy seeing our creative endeavors.
Sunday, November 27, 2011
Thankful for Yo-Yo's
Coming up with new ways to use yo-yo's in my projects gives me lots of joy. So this Thanksgiving I am grateful for these little bits of fabric that bring joy to my life and to those who receive them as gifts. To make the large pumpkin for this months card to my mom I chose orange fabric and then used the Clover Jumbo Yo-Yo Maker to make the pumkin then I used cooper metalic embroidery thread to create the lines in the pumpkin and a small piece of fabric stitched with brown embroidery thread for the stem. The leaves were made with my Cricut. To highlight the edges of the leaves I gently ran the edges against a stamp pad. While doing this I accidently dropped one of the leaves on the stamp pad and when I lifted it up I noticed the ink had highlighted the cuts (or veins) of the leaves giving them more dimension which turned out to be a pleasant surprise for me. In the future I definitely plan on using this technique again but instead of dropping the leaves on the stamp pad I will gently press them on the pad.
Sunday, November 13, 2011
Yo-Yo Water Bottle Cover
Last winter I had the misfortune of losing one of my favorite gloves. I didn't have the heart to throw away the mate so I left it in my car. Then one very cold morning I had ice in my bottled water so I thought I would put the glove on it to help insulate the plastic bottle. It worked great - so for many months I had my glove (with fingers and all) insulating my water bottle. Well, after a while I began to get a little self-conscious when I would take a drink because it looked like I was waving to folks or had an octopus with short tenacles on the bottle bottom. So I took it in the house and sewed straight across the bottom and then cut away the fingers of the glove. For a while I was happy with this but it was a little plain. It just so happened my sister had sent me a yo-yo pattern for a wine bottle cover and I knew I could adapt it to a smaller sized water bottle cover. With a plan in place I found some black and white fabric and started making yo-yos to fit around the water bottle. When all the yo-yos were made I attached them to each other and then attached them to the repurposed fleece glove. Finally, I feel I have done justice to a glove that had served me well.
 |
| Yo-Yo Water Bottle Cover |
Sunday, August 14, 2011
Birthdays: Cards, Gifts, an Elephant, and Pens
July, August and September are filled with birthdays for us. Trying to keep up with them all is a bit challenging but always a lot of fun!
In July I started out making pin wheel cards and as they were easy to make I made a variety of pin wheel cards that I could use for our different family members (and I still have at least one more to make). As you can see by the photos you can change up the paper and embellishments to create a different card each time. I don't know about anybody else but I have an extremely hard time making an exact duplicate of any of my cards or crafts, I've tried, but it just doesn't happen. August is probably the largest birthday month with nine birthdays. To be honest I can only make cards for half that amount and the other half end up being store-bought cards.
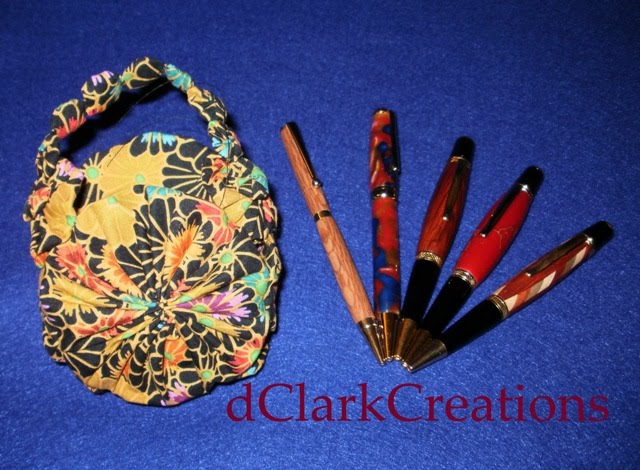
Usually, only one person in August receives a handmade gift but this year I was able to make two. I am only going to show you a photo of the one gift as the other gift needs to remain a surprise as the birthday doesn't fall until the end of the month. Two years ago (or maybe it is three years) my sister visited me and while we were out shopping she saw this tote bag in one of the quilt shops. Well we took pictures of it for the fabric design layout and then when we got back to my house we went through my fabric to select the colors to make the tote bag. Since that time it has sat on the corner of my sewing work table until this July when I got it out, found a simple pattern for me to sew, and got busy sewing. There has already been a request for me to make another tote bag and hopefully I will be able to make it in less than two years.
We also went on vacation in August and one of the fun things I got to do was to ride an elephant. As my sister said, we rode on top of 8,000 pounds of grace and beauty!
After we got home from our vacation we had a couple of extra days to relax. On one of the days my husband and I turned a couple of pens. Kingwood was the wood I chose for my pen (nearest the stamps) as it has a strong wood grain and Don chose Cocobolo (a tropical hardwood) for its lustrous coloring. We both made an American slim pen. As I am still new to pen turning I received a lot of support from Don but I was really excited to learn how to get my wood turned closer to the bushings and to learn how to shape the wood as I turned it to make the bump at the end of the pen. The "bump" is a bit of a signature mark of my husband's pens.
 |
| Pin Wheel Birthday Card |
 |
| Thinking of You Card |
 |
| July Birthday Pin Wheel Cards |
 |
| Birthday Tote Bag |
 |
| Riding 8000 lbs of Grace and Beauty |
 |
| Our Pens |
Wednesday, August 3, 2011
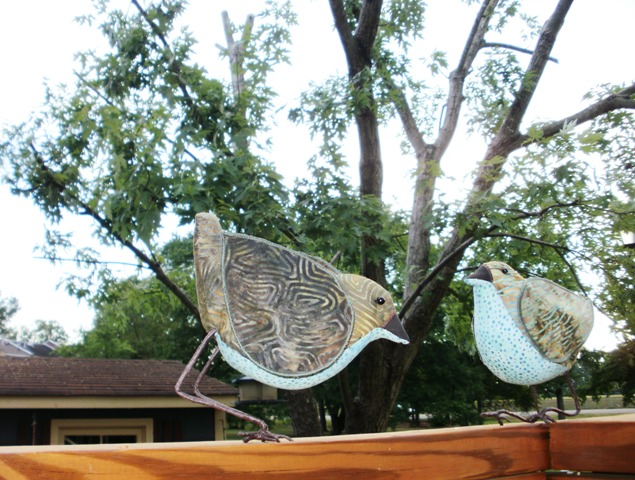
Fine Feathered Friends
 |
| Ready for flight |
Monday, July 4, 2011
Pinwheels and Greetings
 |
| Pinwheel Card for Mom |
Not put away yet was an origami pattern for making a folded star and recently I had seen an article on fabric folded origami. With my idea now firmly planted I started looking for fabric that would make a fun pinwheel and then I started cutting out the squares I would need for the folded stars. Next, I ironed the origami folds onto my fabric. I was surprised that the fabric folded just as easy as the paper did. Then I ironed my shape flat and added just a touch of gold glitter to the edges of the fabric to keep it from fraying and to give it a tiny bit of sparkle. For the "pin" in the pinwheel I used an extra small yo-yo. The pinwheel stick is a skewer that I cut to size and painted with a brown Sharpie marker.
Sunday, June 26, 2011
A Special Gift

Sunday, June 12, 2011
YoYo's, Flowers, Fabric, Felt and More
 |
| Birthday Card for Linda |
 |
| Clover Kanzashi Flowers |
In process still is another fabric bird using the bubbled fabric technique. I'm hoping that this bird will turn out as well as Puff did. Then I am working on a couple of gift ideas using these felt fortune cookies. They are a little monotonous to sew but very fun when they are finished.
 |
| Bubbled Fabric for new bird |
 |
| Felt Fortune Cookies |
 |
| Overseer Boots |
 |
| Our Deck Project |
Sunday, May 29, 2011
Crazy Quilt Book Cover
 |
| Crazy Quilted Book Cover |
 |
| Crazy Quilt Blocks |
The crazy quilt block I really enjoyed making. Whether it was choosing the fabric combination or deciding on the width of each piece or just piecing it - the entire process was really fun! From the start I knew I wanted to make a book cover with my block so I ended up making two coordinating blocks then sewing them together before I cut out the book cover.
 |
| Crazy quilt bookcover opened to outside |
 |
| Crazy quilt book cover opened and ready to read |
Saturday, May 21, 2011
Pen Turning Class
 |
| Don's Pen |
 |
| Deanna's First Pen |
Sunday, May 15, 2011
Fabric Bird Named Spreckles
 |
| My Bird Spreckles |
Friday, May 6, 2011
Yo-Yo Vase of Ribbon Flowers
 |
| Mother's Day Card for My Mom |
Sunday, April 24, 2011
Easter Eggs of Yo-Yo's
 |
| Egg-cellent yo-yos for Easter |
Sunday, April 17, 2011
"Puff" the Bubbled Fabric Breasted Bird
 |
| "Puff" |
Sunday, April 10, 2011
Bubbles and Birds
 |
| Bubbling Fabric for the Birds |

Now that I have overcome that hazzard the next part of my design idea is to see if I can cut and sew the breast pattern piece from the bubbled fabric. The bird pattern I am using is one created by Terry Grant for the 2009/2010 International Quilt Festival magazine. As I was mulling this over before falling to sleep last night I decided I would need to draw the breast pattern piece on the back of my fabric and then stitch around the drawn line before cutting out the piece. By sewing on the line I'm hoping to anchor down my bubbles so that when I cut it out the shape will remain.
As Mom's Easter card is waiting to be finished and a couple of birthday presents and cards need to be made, I'm not sure when I will get back to this part of my fabric bird so you'll just have to keep checking back! Oh, and don't forget to wish me luck on this process, I think I'm going to need it.
Sunday, April 3, 2011
Happy Birdie Day
 |
| Happy Birdie Day! |

Printing on Ribbon
I am still waiting for the book Fabric Embellishing the basics and beyond I ordered a couple of weeks ago to arrive. Hopefully, it will be in my mailbox this week. One of the projects I remembered from looking at Connie's book was printing on ribbon. I decided to try it this weekend and I am pleased with my first results. The book recommended to make your design layout, then save and print your design. This helps for your alignment. Next, you center and place your double-stick tape over your printed words or design and then lay your ribbon on top of the tape making sure no tape is exposed. Then I think it said to put a piece of tape over the ends of the ribbon so the edges did not catch in the printer roller. Next, you place your ribbon paper back into the printer and print your file again. With a little luck your words or design will be centered on your ribbon. Some of mine printed a little off center but for a first effort I am thrilled.
Along the way I learned that I do not need to anchor all the edges of the ribbon down with tape. Just taping the ends down that feed through the printer works great. I think when I removed the extra tape from the edges it caused my ribbon edges to be extra wavy. Also, I do not need to bold the font as the bolding causes the ink to bleed more (this could also be due to my particular printer ink or the type of ribbon I was using). The last ribbon on the bottom is the one I used the bold font on and you can see how much darker it is.
What worked really well was expanding the font spacing. This kept the letters from blurring into one another. For this project I used the 1/2 " double-stick tape but yesterday while I was out I picked up some 3/4" double-stick tape and plan on experimenting with wider ribbon and using some of the wing dings or graphics.
 |
| Printing on Ribbon |
 |
| Printing on Ribbon Detail |
 |
| Printing on Ribbon Close Up |
Sunday, March 27, 2011
A Day-Cation
 |
| Cherry Blossom Trees, Washington, D.C. |
 |
| Union Station |
 |
| Washington Monument |
 |
| Spirit of St. Louis |
 |
| Self-Portrait Shadow Play |
 |
| Space Exploration Display |
 |
| Air and Space Museum Wall |
Sunday, March 20, 2011
YoYo Hearts of Clover
It was the "luck of the Irish" I finished this card in March. It still needs to be mailed but it's finished. I'm not at all sure about the difference between a 3-leaf and a 4-leaf clover (I'm sure I could look it up) but for the sake of this design I liked the 3-leaf clover made of yo-yo hearts the best. The yo-yo clovers are made with both the large and small heart yo-yo makers. For the centers I knotted some gold braid, it is the same braid that forms the stem. The finished card is not exactly as I visualized it when the idea first hit me but the best part is next year I will get to try again as I absolutely love coming up with new ways to use the different yo-yo shapes in my cards.
 |
| YoYo Hearts of Clover Mom's March Card |
Sunday, March 13, 2011
Apple Salad
 |
| Apple Salad Hot Pad |
 |
| Apple print fabric |
We started out with our two pieces of fabric. I chose this apple print I had and then a cream colored fabric. These were backed with a double-sided fusible. Next we cut wavy strips on one fabric going horizontal and on the other piece we cut our wavy stips going vertical.
 |
| Weaved fabric |
 |
| Back side of Apple Salad hot pad |
Sunday, March 6, 2011
Latest Binder Cover
Each day I come into my craft room and try to create I look around, shake my head and tell myself there is just way too much stuff in the room. While trying to thin out and pare down the amount of yarn, paints, beads, saved articles and you name it I ran across some old sewing supplies, I may have mentioned this in an earlier blog. I saved the best of those old sewing notions but I didn't have the heart to throw out the ones that were "not so perfect" so my solution was to cover another binder using these items. Somehow I convinced myself that this project was helping to clean out my room - it's a weird justification but it allowed me to be creative while quieting the nagging little voice that was telling me I should be reorganizing and cleaning. Looking at this binder cover and my first binder cover I feel as if I have kind of got the knaack of it.
 |
| Inspired by Old Sewing Notions |
Sunday, February 27, 2011
Annual Challenge Update
 |
| Tree Challenge 2011 |
The quilt show was very inspirational. I just love seeing all the different quilt types and the different techniques that are being used in the quilts. While at the show I purchased the Clover small oval yo-yo maker and the butterfly yo-yo maker. The small oval yo-yo maker so far is my favorite as I'm still trying to figure out the butterfly yo-yo maker with it's two-step process. Hopefully, soon I'll be able to show you some beautiful yo-yo butterflies.
Part of our annual trip to the quilt show is to select our next challenge. This year it was Connie's turn to choose and we will be making a bird (possibly using the Artful Bird: Feathered Friends to Make and Sew by Abigail Patner Glassenberg ) but we can use any pattern or make up our own plus we need to make a brooch to be worn at the 2012 quilt show. For the bird we can use any pattern but we must personalize it somehow - for me that may be figuring out how to embellish it with some yo-yos and for Connie she might create and use some of her fantasy fabric. For now - anything and everything is possible!
Sunday, February 20, 2011
"Romancing Spring" Butterfly Yo-Yo Card
With February being such a short month I knew I could not get a Valentine's Day Card made in time to send to my mom but I wanted to use my heart yo-yos. About the time I was working on the card we were having some very pretty "spring-like" days and I looked at my design and it looked like the butterfly was romancing spring and that is how the card got it's name. The butterfly was made using Clover's Large Heart Yo-Yo Maker for the wings and for the body I used Clover's Extra Small and Small Yo-Yo Makers. Did I mention I love my Cricut Expression machine? It is the best for cutting out letters and designs.
Of course I have never been good working at just one thing at a time so while working on my mom's February card I have also been paring down and weeding out some of the craft supplies I no longer use or use very seldom as I want to make room for a new table I purchased which has been riding around in my car, still in its box, for the last several weeks. The other project (besides the Tree Challenge piece) I started was a collage binder. While going through my many boxes I came across some old seam binding packets produced by Penneys with the prices on the top. One packet of 1/2" wide seam binding sold for 17 cents and another one that was extra wide sold for 27 cents. As I had several of these packets I decided I would decoupage them onto one of my empty binders and when completed it can hold some more of my magazine articles. My husband often refers to me as "Monica" for the Monica on the sitcom Friends who categoried and organized everything - as I have a strong tendency to do that too. My magazine articles are broken down by reference such as the best glues or threads to buy and project type such as home decor, clothing, or kids projects. Other items to be included in the collage are old zipper and snap packets. You may remember back in 2010 I had a play date with my friend Connie and covered a binder using a few of Julie Nutting's techniques. It was so much fun I decided to try it again. If you haven't seen any of Julie's work I really encourage you to visit her site.
 |
| Romancing Spring-Mom's February Card |
Subscribe to:
Posts (Atom)