Sunday, January 30, 2011

Mom's January Yo-Yo Card

Mom's January YoYo Penguin Card
This little penguin reminds me of the penguin in the movie "Happy Feet", just full of character. As often happens with me I was looking at the oval shaped yo-yo laying on my table and I saw a penguin form. My next step was to figure out how I was going to make everyone else see the penguin too. For the body I used my Clover Large Oval Quick Yo-Yo Maker and then I made two small white yo-yo's for his bib, and two extra small gold yo-yo's for his feet. His wings are cut from black felt and his nose from gold felt. He needed a little red bow to dress him up and two black eyes to bring him to life.  I think when I make my next yo-yo penguin I will again use the Clover Large Oval Quick Yo-Yo Maker for the body and then I want to try using the Clover Small Oval Yo-Yo Maker for his bib.  As I don't own the small oval yo-yo maker I'm going to need to go shopping! I can also just cut my fabric in an oval shape and sew around it to make the shape and I thought about it but I really like the consistency I get using Clover's Quick Yo-Yo Makers, it takes the guesswork out of if I am making too small or two large a stitch. But no matter which way you sew a yo-yo they are always fun to make and the creative possibilities are endless.

Sunday, January 23, 2011

Working on the Challenge


Tree Challenge Beginnings

Here I go starting something new without finishing what I already have started i.e. the binder cover. But I just wasn't up to the task of marking measurements this week to finish the binder cover and here was my tree challenge project tempting me to try "just a little" fused applique - then I got hooked and several hours later is the result of the photo you see.   Of course it is just the beginning as I want to embellish the piece with embroidery stitches and couching. I'm thinking of using the couching technique with yarn on the tree trunk.  I'm not sure yet of the best approach to make it look like the branches are under the leaves and I'm not at all sure how I'm going to highlight the leaves but I know once I pull out my threads and sit down to play it will just start to fall into place. Maybe with luck I'll be able to at least finish the piece by the due date.  I'd like to be able to turn it into either a binder or journal cover before the due date but that might be just a little too ambitious.
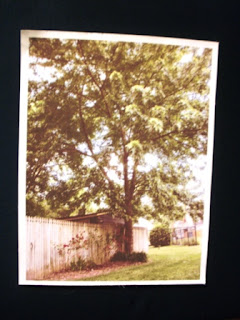
Tree on Fabric Transfer Sheet
The second photo is the picture I took of the tree from my yard which I  transferred onto a fabric sheet using my printer. My original thought had been to make my tree piece look exactly like the tree in my backyard but then as I was working I realized I didn't like the chain link fence and the one bush looked a little too out of place and then it "dawned" on me - I could use the aspects of the photo I like and remove the rest so that's what I did - I cut everything away from the tree that I didn't want and fused the rest. Now I can see why this can be so addicting - it is so much fun.


Sunday, January 16, 2011

Painted Faces Binder Cover

Painted Faces Binder Cover in Progress

 As I mentioned in an early blog I am trying to finish some projects that are just sitting around taking up valuable crafting space. I can't believe it is going on 4-years since I took this Painted Faces for Beginners class taught by Bonnie McCaffery at Quilting Adventures. It was a great class and I had every intention of turning the face I painted into a portrait quilt. Then the dilemma came as to where will I put it, so it sat and sat and sat. Finally, I decided to make it into a binder cover.  I have lots of old binders with all my craft project directions stored in them and by turning my "not so perfect" painted face into a cover, I will get to enjoy it a lot more often than if it was hidden in a drawer.  The pictures today are of the raw edged cover, so far all I have done is cut the main binder cover piece. It still needs to have the pockets added and be trimmed to fit.  Now that I have gotten it this far I can't wait to finish it and have it grace my bookshelf of craft books and binders.

Sunday, January 9, 2011

All About Birds

Whimsical Birdhouse
It seems 2011 is definitely the year for birds. Not just chickens and owls but all birds and that is really exciting as birds are fun and whimsical and entertaining. I love watching the birds that visit my backyard, I get visited by cardinals, blue jays, crows and all sorts of smaller birds. This wonderful little ceramic and wood bird house is a Christmas gift from my son and family and I love it. It reminds me of my mom and her love of teacups, it speaks to both the creative and whimsical side of me and just plain makes me smile when I see it.

When I set the birdhouse on the shelf in my kitchen my first thought was it needed to be surrounded by birds and then I got surprised by another of my Christmas presents as there was this very comical punk looking cardinal in my gift bag. He is the greatest accompaniment to the bird house. The other cardinal I had sitting on a shelf in the living room so I moved him to be near the bird house but I still think I need more birds. And then just this week my friend Connie sends me a link to Abby Glassenberg's website. She does an amazing job making birds out of fabric and she even has a book out called The Artful Bird: Feathered Friends to Make and Sew. Then I remembered in my International Festival Quilt 2009/2010 magazine there is a pattern and directions by Terry Grant for making fabric birds which I have been wanting to try. I think they will look great sitting on the shelf with the bird house and I can't wait to get started.

Sunday, January 2, 2011

Cards for the New Year

Party Hats
January 2011 starts a whole new year of birthday cards, monthly cards and gifts. For the early January birthday cards I pulled out my Cricut Expressions machine to help me get these two cards made. The first card I made was for my grandson using a brown card stock to cut out the letters and then laying the cardstock on the cream colored card I glued the cutout pieces for the b and p's. I layered the one birthday hat and used a foam layering tape for a 3-D effect. 


3-D Butterfly Card
 For my granddaughter's card I was inspired by a card I saw in a magazine, so I started looking for papers in colors to give me the same effect.  Again, I used the foam layering tape on her card as I like giving cards depth and dimension. 


Gift Certificate Holder and Nifty Notes
I also made her this gift certificate holder by folding an 8 1/2" x 11" paper in half. Then I cut one of the pieces to measure the length of the certificate, the other piece I cut notches on each side to create a tab. Next, I cut a small piece of ribbon across the short half of the cerificate holder so that it would hold the tab in place and then I sewed around the holder locking in the ribbon. To personalize it I used my Cricut machine to cut out her initials and glued them to the tab. This hot pink flower button was added to one of the Nifty Note holders I made for her earlier in December, it matches the hot pink note pad inside the holder.